This tutorial will deal with how to shape your midi note by using continuous controllers (CC) or by using just midi commands. Although our goal is to come as close as possible to the sound of real instruments such as strings, brass, and woodwinds, you may use these techniques with synthesizers as well. By varying different parameters you can prevent the results from sounding static, boring, unnatural or robotic.
It is very important to keep in mind that we are trying to simulate humans, nothing else. Before we get down to business it might be helpful if you listen to some live performances of real instruments (e.g. on YouTube) since live performances are the source that we want to emulate.
The second part of this tutorial will show you how to apply this device in order to create real sounding instrument sections. For example, if you are going to build a 3-part trumpet section, there are some nuances that have the ability to reveal the part as being fake within just seconds. Our ears, and also your clients’ ears, are very experienced in recognizing how real instruments sound, so unfortunately only a few tiny changes or mistakes could be enough of a reason to burst the bubble and reveal the truth.
The 3 Parts Of A Note
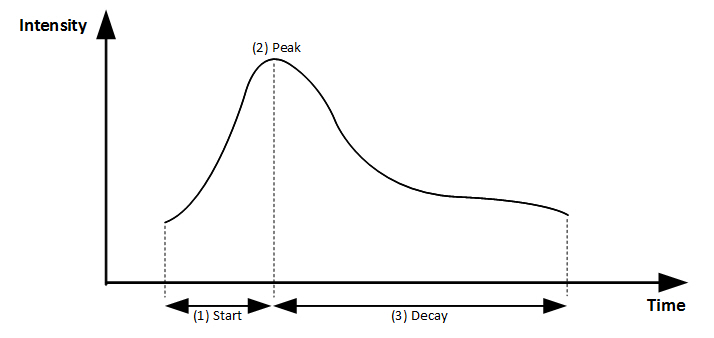
Independent from its context a single note normally follows a particular curve. All notes produced on natural instruments follow this curve in some way.
To be sure, the three elements of the curve may vary from context to context in length and intensity, but do you realize that there are no parts of the note that are totally flat?
(1)
The first segment obviously is a rise in intensity produced by a bow stroke on stringed instruments or the vibration of the air column in brass instruments. This segment may be very short, for example, when you listen to staccato phrases.
(2)
The second segment is important because it enables the ability to distinguish between different dynamic layers – from pp to ff. The higher the peak the louder the note. Of course, you can hold a peak for a specific period of time but be aware of the fact that it does require some effort to allow a note to sound very loud for only a few seconds. This effort means that the bow of a string player needs more pressure and speed, and a wind player needs a lot more air.
(3)
The last segment is the decay. When you play a single note it will usually become softer and quieter as it ends. So the decay is dynamic. Don’t forget that it can also be a crescendo into a stab – like the brass section in a big band. The best way to decide whether or not a line that consists of many notes can be played by a wind player is to whistle it yourself – but make sure that you pay attention to the dynamic markings. If you need to breathe before the line is over, you better include a break. This is one of the most important points you need to keep in mind in order to make your samples sound real. Additionally, when you write staccato or spiccato notes you don’t need a decay for your notes. Most of the samples come with release recordings so in most cases you don’t need to do anything manually.
Important: You must find a comfortable way to increase or decrease the intensity of your samples smoothly. In most cases the mod-wheel (CC#1) is the trigger to cross-fade between different dynamic layers by default, but it really depends on how the virtual instrument is set up and programmed. Don’t try to affect the intensity with volume because when you play an instrument from pp to ff its frequency spectrum changes. If you want an instrument to play very quietly, don’t use fortissimo samples and simply turn down the volume. That is not going to work! Therefore, the only thing that you affect by changing the volume is the balance and the relation to other instruments in your arrangement.
Note: In order to make a single note more interesting don’t forget to use the right amount of vibrato. In many cases a long decay is the perfect area for that modulation. Again, listen to some real players and understand when and how they use vibrato.
Examples Of Note Shaping On A Single Line
To begin, let’s listen to some examples in order to make clear what note shaping really is all about. The first part of Example 1 is a short line taken from the German Christmas carol “Snow falls softly at Night” (original title: “Leise rieselt der Schnee”) played by a virtual alto saxophone without any note shaping. You will realize within seconds that this line is not played by a real alto sax.
Example 1
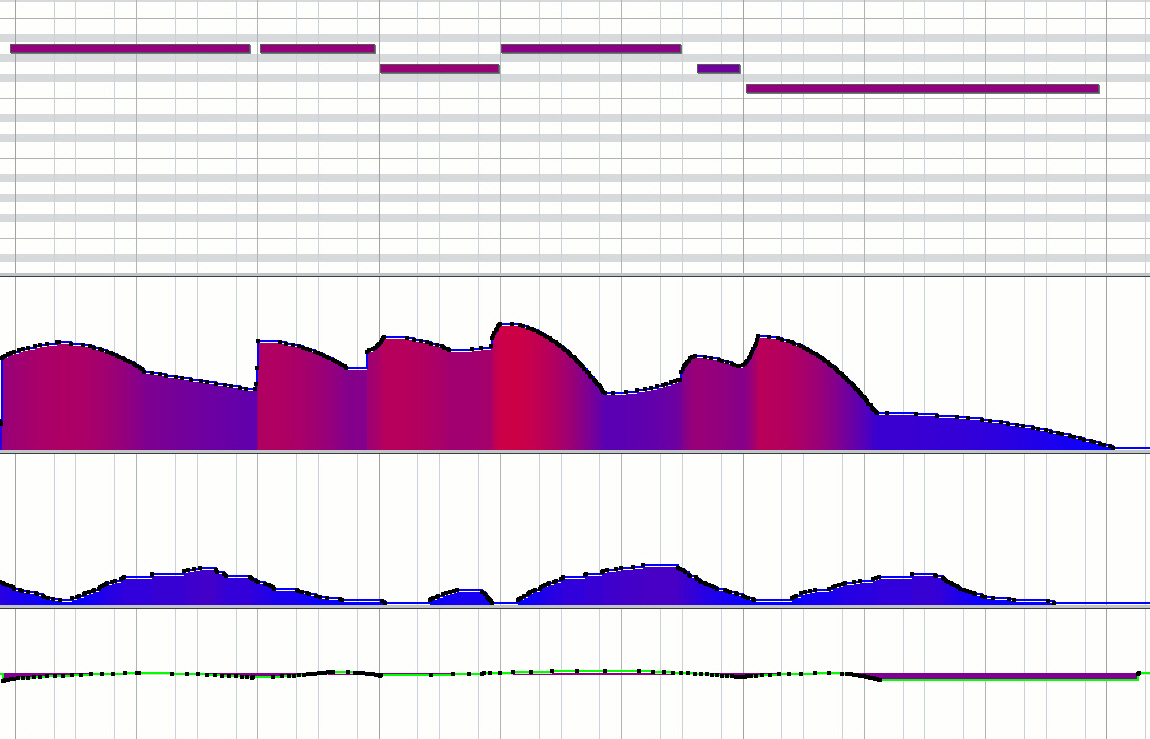
Now, let’s add some CCs in order to make those notes sound better. In fact, there are several parameters that are used in order to produce a realistic performance. Here is a picture of the key editor. The line above is the melody line, the curves underneath depict the motions of the different CCs.
First, did you notice that the notes are not quantized to the grid. They vary slightly and therefore, mirror the behavior of a human player. The first line underneath the notes depicts the shape and motion within the notes. This is the subject of the preceding chapter. The blue curve underneath is the amount of vibrato. The peaks of the vibrato always fall into the decay of a note – at least in this case. Right at the bottom you will find the pitch bend, which plays around a perfect pitch. This is a real nuance, but it is natural and therefore, it adds another little bit of realism to the phrase. Briefly, here are some suggestions to keep in mind in order to make a midi performance sound more natural:
- Do not quantize your notes to a grid.
- Let every single note breathe; this is called tone shaping.
- Do not forget about vibrato.
- Do not use perfect pitches, use the pitch bend.
- Do not copy and paste CC data.
- Do not forget that wind players need to breathe.
- Listen to live performances for references.
Note: In order to make a midi performance sound really good and very realistic you will need to edit many different parameters. However, on the other hand, if only one parameter is set a bit untypical, your performance will sound fake. So in this case, it is totally true: The devil is in the details!
Building Up A Section
A section consists of single lines that are played simultaneously. So the first step is to check whether or not the performance of every line is OK by itself. Next, there are some very important points you need to keep in mind.
- Do not let all the instruments start at the same time. Instead, try to “roll” into the chord or notes.
- Do not change the number of players during a song.
- Use some small variations at the peak of every instrument.
- Use different lengths for the decay.
- Give every instrument a unique shape that refers to the decay.
- Use different vibrato settings for every instrument.
- Keep the section dynamic and moving along with regard to expression.
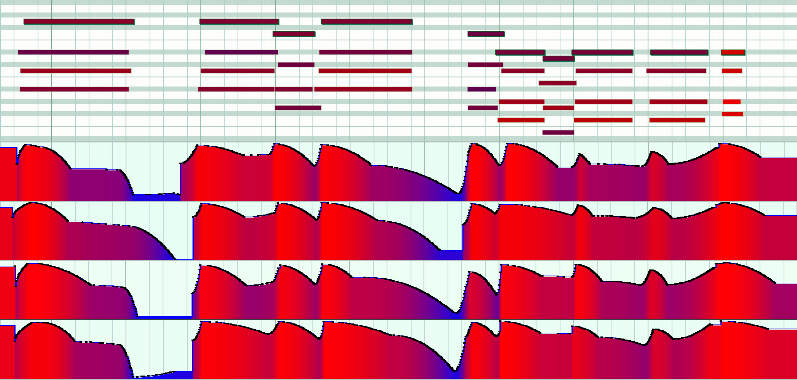
Please listen to Example 2. The setting consists of two alto saxophones, one tenor saxophone and one baritone saxophone. The first alto takes the melody, and the other instruments support the main line by harmonization. The result is a four part section which moves block-wise. Again, the first snippet is a record of the lines without any note shaping; the second one uses expression, vibrato and pitch bend.
Example 2
Summary
Your whole phrase is only as good as the quality of your single notes, so build up your phrases by shaping every note. This will bring dynamic, character realism and life into your performance. Don’t forget that a section is played by many different people, it is not the same person on all the instruments. So it is very important to vary the articulations, the decay and some other nuances (midi data in general) in order to retain the illusion that it is a live performance played by many musicians.
Note: Some people out there may consider doing all this as far too much effort. The truth is that real musicians spend many years sometimes decades, in fact, practicing to master a specific instrument. Since this also is a matter of training and repetition you will develop solid skills in midi editing in just a short period of time. Take your time to figure out what midi curves fit best into your arrangement and most importantly, have fun!
For those of you who are interested in listening to the finished song:
Example 3

