When dealing with recordings (either virtual instruments or live-played instruments) often the sound is not very sophisticated. Here is one little trick on how to get a better, richer and more expensive overall sound – no matter what type of instruments you are using.
What does ‘expensive’ mean?
Although there are some limited ways to correct the sound of a mix down in the mastering process, this tutorial is not about mastering nor mixing. It’s about getting single tracks to sound great by themselves in the first place to avoid spending a lot of time correcting mixing mistakes later. Actually, this is the first step even before the mixing process starts. Make sure that you have access to all the single tracks in your song since it will be necessary to edit every instrument differently.
In order to show what our goal is, in a practical manner, we first need to define the word ‘expensive’ in a musical context. Listen to Example 1 (preferably on good headphones since we would like to get a very close look at the frequencies) with the volume reduced to a minimum.
- I switch between two different versions of the same song every two bars; at low volume the difference between both versions should not be so big.
- You should be able to tell what instruments are being used and what they are playing no matter what version you listen to.
- So why should I move on with this tutorial anyway?
Important: If you want people to listen to your music, and especially if you want to have success with your music, the above described case isn’t reality. Usually people listen to music loudly because their brain tends to equate loudness with quality (compare this with cinemas, theaters, concerts or even car audio systems). If something doesn’t sound good on high volume then there is no quality involved.
Example 1
Listen to Example 1 again (on the same headphones); however, now turn the volume up but be careful of your ears. Now, some frequencies become very disturbing; they even hurt. So this shows that our task is to make the music sound great at high volume, not at low volume. Although one versions sounds brighter, this is not achieved by simply increasing the high frequencies. It is a bit more complicated than that, as we will see.
It is advisable to listen to some modern pop or rock productions, since they are a superior example of quality in the above described context. Additionally, if something sounds excellent at high volume then it usually will sound excellent on low volume, also.
Manipulating Frequencies
Without a doubt, getting a rich and expensive sound is the result of many decisions that must be correctly made during the entire production process, because every correct decision adds a bit more quality to the track. However, let’s focus on just one option for now.
Note: Since our ears do not work linearly, it is to be expected that some frequencies will suddenly become more pronounced when the volume goes up. However, I don’t want to get too deeply into physics because we would like to keep it practical at this point.
Getting the right sound is always about manipulating frequencies. There are many tools at our disposal to achieve this, such as: equalizers (EQ), enhancers, loudness maximizers and many more … even reverberators. I’m going to use the equalizer because:
- it comes with every audio editing program
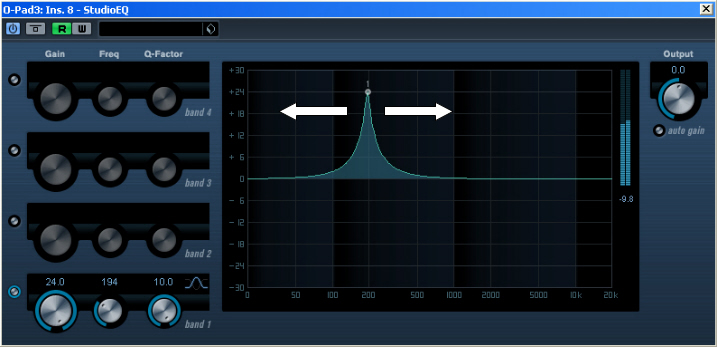
- when using the highest Q-factor you may manipulate just a few frequencies
- it only manipulates the frequencies and does nothing else but that
The following illustration shows the usual, unedited frequency spectrum of a single instrument on the left and the spectrum we want to create using our EQ on the right.
Obviously, our goal is to flatten the frequency curve of every instrument in order to keep all the frequencies under control at high volume. This way the mix down of several different instruments is much easier because you don’t need to deal with single frequency peaks anymore.
Theory Turned Into Action
The first thing we need to do is find the frequencies that we need to edit. So, activate a band of your EQ and start sweeping through the audio material slowly. You are going to find fundamental frequencies as well as harmonics. Keep in mind that these frequencies are not static… they change according to the tone pitch; the dynamic involved in the playing performance and the articulation; so it might be necessary to automate the EQ settings along the time-line in order to catch the changing frequencies. Of course, this is not true for non-tonal instruments, like percussion and drums.
Once you have found the resonant frequencies, reduce them carefully using the highest Q-factor. Trust your ear and don’t overdo the reduction otherwise the instrument is going to sound very thin and tinny. I assume that the reduction is going to take place somewhere between -3dB and -10dB. It might be helpful to use a real-time spectrum analyzer, like the “Pinguin audio meter” or the “T-Racks3” spectrum analyzer but these tools can’t replace the best device you have at your disposal, your ears.
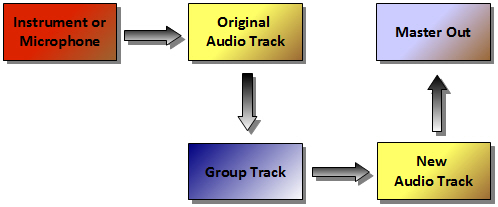
It could be possible that you will find many frequencies that you want to reduce and one 4-band EQ just can’t catch them all. In that situation, don’t worry about using as many EQ instances as you need to, to achieve the best sounding result. Most sequencers offer a limited amount of insert-fx-slots (usually eight). In order to free those slots after the frequency editing process, record the edited instrument again to a new audio track with all EQs activated. Usually the sequencer software doesn’t allow routing one audio track to another one, so you will have to find a workaround to fix this routing issue. The following picture is about how to solve this problem in Cubase (since version 5, before that free routing was not possible).
Although the CPU isn’t the performance bottleneck that it used to be, we always recommend deactivating all plug-ins on the original instrument track. We won’t need the original track for the playback anymore since it has been re-recorded. Remember, do not give away any CPU power (or even DSP card power) without a good reason.
Note: If your EQ is not a VST3-plugin I highly recommend to deactivate it rather than bypass it. Because when on bypass the CPU still calculates the effect in the background even though it’s not audible. Only deactivating the effect really frees the CPU power again.
The example uses the whole described process in an A/B-comparison. One part uses no EQ at all, so it is obvious that there are many frequencies that make the overall sound muddy and nontransparent. The other part uses many instances of EQs on every track. All the frequencies were located by sweeping through the spectrum. The result is that every instrument now has more clarity and doesn’t compete with the other instruments anymore.
As always, please keep in mind that there is no such thing as a Holy Grail in audio production. Excellent audio production is achieved only by experience and a big amount of experimentation. At least, that is what I believe.


