Music genres like rock or metal consist mostly of drums, bass and guitars. This tutorial is only about guitars. We are going to show you how we record guitars for rock and metal music tracks and how we place them in the mix. Music genres like rock or metal consist mostly of drums, bass and guitars. This tutorial is only about guitars. We are going to show you how we record guitars for rock and metal music tracks and how we place them in the mix.
Requirements
The most important thing is to have a guitar player who can deliver a solid performance. A poorly played performance can be corrected in the audio editing process but this is going to take a huge amount of precious time so if you have to meet a certain deadline you cannot afford to spend a lot of your time correcting wrong notes, timing problems, and so on. If you cannot afford to pay for a professional session player, and you are a moderate guitar player yourself, then try this:
If you are using guitar modeling software, such as Guitar Rig or Amplitube, you will want to record the signal dry and clean as a start. Remember, since the final guitar sound is created after using a plug-in you don’t have to record your guitar part in real-time. In fact, you can even use half-time or any slower tempo that you feel comfortable with. Then use the time-stretch function of your DAW (digital audio workstation) to make the tempo of your recording match the tempo of your project. Although this procedure does create solid results, there are some limitations. The time-stretch function either adds samples to your recording (according to a specific algorithm you usually need to select first), or it removes samples from your recording so artifacts will usually be audible if you use this function too much. Therefore, using less time-stretch leads to better results. The best quality you can get is a performance that is played in real-time with no time-stretching at all.
The Recording Process
Nine times out of ten, one single guitar track doesn’t lead to good sounding results, except maybe for a lead guitar solo. So it will be necessary to record each guitar part at least twice in order to double all the parts in the mix. Use different amp simulations for every guitar track and make sure that the sounds of the various amps complement each other. This means that you don’t want the doubled track to sound too much like the first one.
Note: If you just duplicate a recording the result is not doubling because this only adds volume to the original track (when using no frequency modulation effects).
And remember: You may use a slower tempo and/or you may record every part at a different time. If you do so, always start recording some bars before the actual part begins because you want to create a fluent transition from one recording to the other.
How To Place Guitars In A Mix
Most rock songs contain at least of two different guitars playing at the same time. The first thing we need to deal with is panning. Since we want to create a wide spread and powerful guitar wall, here is one way to go:
- Guitar 1: approximately halfway to the right, doubled with another part playing exactly the same pattern panned completely to the left.
- Guitar 2: approximately halfway to the left, doubled with another part playing exactly the same pattern panned completely to the right.
- Guitar 3: in the middle playing higher notes which complement the chord structure.
Of course, all guitars may play the same part in unison or in octaves. If your song is complete with two guitars, then don’t use the third one. Whatever arrangement fits your needs best, go with it. Listen to Example 1 in order to get an idea of what the above described panning sounds like.
Example 1
The next part we are going to focus on is equalization (EQ). Here are some basic guidelines for equalizing (EQing) guitars:
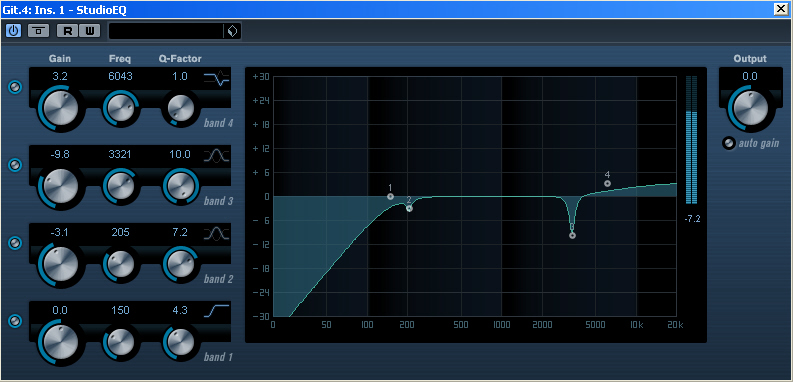
- Do a low-cut at around 150Hz, because all frequencies below 150Hz belong to either the electric bass or the kick-drum but not to the guitar.
- There are often some resonance frequencies between 180Hz and 500Hz, so find these by sweeping through these frequencies while reducing them between 5dB to 8dB. Always use the highest Q-factor possible during this entire process.
- Take a look at the frequency spectrum between 2.7kHz and 3.6kHz, you will usually find one or more frequencies that are quite disturbing. If so, then sweep through the frequency spectrum again and reduce this frequency generously.
- Often a smooth boost with a high-shelf at around 4kHz will brighten up the sound.
Finding the right frequencies requires experience or the trial and error method (which leads to experience anyway). Just don’t get frustrated too soon, because like everything else it’s a learning process. Listen to Example 2: the first version is without any equalization, the second version has every track equalized.
Example 2
Reverb is very important for creating depth in the mix. For music genres like rock or metal the function of reverb is to emulate the environment of the recording studio as well as the instruments being played in that studio. Although there are no rules on how to use reverb, here are some points to think about:
- Reverb normally is used as a send effect, not as an insert effect.
- There are three things that define a space or room: the direct signal, early reflections (ER) and the tail, and all of them are equally important.
Reverb glues together different guitar tracks or sounds in general. - To find the appropriate length for the tail, just follow this guideline: the faster the song the shorter the tail.
- By using reverb you can create a sonic foreground, middle, and background; rock guitars normally play in the middle of a mix, behind the vocals or the solo guitar but in front of the drums; I suggest playing with the arrival time and the amount of early reflections (ER) in order to position the guitars properly.
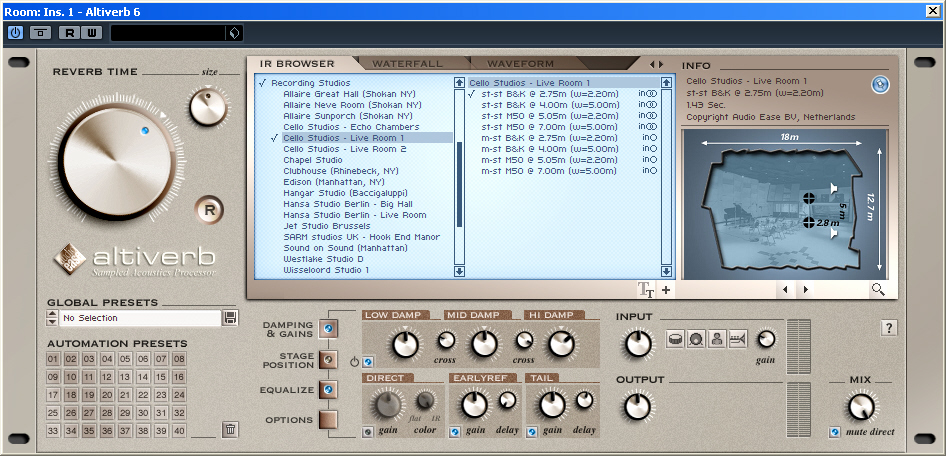
Here is an illustration of my reverb settings, which are quite usable for rock. The dry/wet-ratio should be at 100% because we are using the plug-in on a send bus. Additionally, you want the early reflections to arrive at the listener first; the tail comes later. In order to control the arrival time of the tail, we set the knob called “delay” to 21msec., and a little boost at around 4kHz will brighten up the overall sound.
In order to highlight a guitar solo use less reverb because this is equal to a higher amount of direct signal. This is going to push the lead guitar in front of the riff guitars that are playing in the middle of the mix. Now listen to Example 3: the first version is without additional reverb, the second version has Altiverb turned on. What reverb to use always depends upon the musical genre and upon your personal taste such as: plate, room, ambiance, spring, hall, etc. If you don’t have any specific ideas in mind, listen to bands in the desired musical genre and try to get as close to that as possible.
Example 3
Additional Effects
You can add almost every effect to guitars like flanger, chorus, delay, wha-wha, octave-creators, etc.; however, at this point I would like to focus on how you can get a more aggressive sound.
If your guitars sound like the player was a bit lazy during the recording session, here is a little trick that you can use to sharpen the attacks later: Use a limiting amplifier (for example, the 1176SE from Universal Audio) as an insert effect on a separate send bus. Mix this bus slightly underneath your guitar tracks. This is going to add a bit more punch to the guitars. By the way, this trick is normally used to make drums sound more aggressive, but it also works for guitars.
Example 4
Example 4 shows the effect that the 1176SE adds to the guitars in an A to B comparison. It shouldn’t be very hard to tell which version is using the effect. Furthermore, listen to Example 5 since it shows the final mix of drums, bass and guitars (including a solo passage).
Example 5
Note: The best effects are barely audible when active; however, when they are on bypass you can tell the difference in a second. So, because you want to retain a natural sound, don’t overdo it.


