Thankfully, despite the crippling budgets and restrictions of the modern media scoring climate, some composers still get the amazing privilege of working with a live orchestra to record their work. While the excitement and transcendental sound makes it completely worthwhile, the process also adds some steps to your workflow.
This article will take you through an outline of the process; highlighting some important considerations and helping you feel prepared for your session day.
From Sequence to Score
Especially if you are part of the younger generation of emerging media composers, you may be used to working only in your sequencer: recording or clicking in tracks through the piano roll or via MIDI keyboard and worrying about nothing beyond ensuring that your virtual instrument mix is the best it can be.
This is all too commonly the case, sadly, because working with live instruments is becoming a rare luxury, especially for less experienced folks. Nevertheless, it’s important to be able to take advantage of the opportunity should it ever come your way, and that means being able to orchestrate and engrave your work.
Orchestration is a vast and beautiful art and teaching it is way beyond the scope of this article, but suffice it to say that one is continually learning to orchestrate and that if you want to be successful when working with live musicians, you need to know how to notate and, more importantly, to write for them.
This merits some explanation.
Orchestrating & Writing for Live vs. Sampled Instruments
If you’re used to working with just sampled instruments then you’re probably fairly lazy when it comes to orchestrating. It’s not an insult, and we’re all a bit guilty of it, so I say it to point out that scoring for a virtual ensemble allows us to “cheat” our way into the sound we want. Getting a huge sound doesn’t require adept voicing of chords and instrument choice with a virtual ensemble: it just requires the latest and greatest epic ensemble patch and some extra volume and reverb.
Another thing we can cheat at is levels and balances. Using virtual instruments, a quiet flute part can easily stand out above an orchestral accompaniment, but with real musicians the flute would likely be drowned if it weren’t close-mic’d or otherwise treated. The big paradigm shift, then, is understanding the strengths and limitations of your samples vs. the live orchestra.
Live musicians need to breathe, for instance. Your virtual flautist does not. For a real ensemble, divisi elements also significantly affect the sound and volume of a section since you only ever have a set number of players. Having them split up means fewer of them playing each line. Using virtual instruments (more often than not) split lines simply mean you’ve stacked another full ensemble on for each line, resulting in an unnaturally huge sound. It’s these sorts of things that one needs to keep in mind.
So when I talk about writing successfully for a live ensemble, what I really mean is writing in such a way as to make the musicians feel like you wrote it for them and not for their digitized android brethren. Make their parts idiomatic and intuitive, make them fun to play, make them possible to play, and your musicians will thank you.
Before moving on, I should specify that writing for live instruments is not about dumbing down your virtual mixes. Quite the opposite! Make use of the fact that live musicians are infinitely more expressive and flexible than virtual ones. If you’ve only ever written for virtual ensembles you’ll automatically be used to avoiding certain techniques and figures because they’re nearly impossible to virtually reproduce: slurred runs in the strings, soaring legato lines, triple-tongued brass, and woodwind flourishes…the list goes on.
Your real ensemble can accomplish all of those things and more, so don’t be afraid to challenge them and yourself with more advanced techniques. Just make sure the writing is realistic and suited for real people to play and don’t expect them to adhere to the static and distorted standards set by your sample libraries.
Engraving and the Art of Notation
So, assuming you’ve got a good handle on writing for the live ensemble, your most time-consuming task will likely be transferring what you’ve created in your sequencer to a decently notated score. There are several approaches to this, and the most common is exporting a MIDI from your sequencer to your notation program and then “cleaning it up”. If you’ve ever tried this, you will likely be familiar with the fact that said cleaning often feels less like tidying up a bedroom and more like recovering from a hurricane. Especially if your piece is complex, the transfer can be devastating.
Another method is to simply use your sequencer’s built-in notation system to handle your score. Personally, I have yet to see a sequencer notation module that allows for the flexibility and aesthetics of a dedicated notation package, but your mileage may vary and in any case it tends to make the cleanup process less painful.
A third option is the one I tend to follow, which is to write it directly into my notation software. If you know ahead of time that you’ll be working with a live ensemble and a mock-up is not important, then writing it straight into your notation program will save you much time and headache and result in a cleaner, more polished score. It also tends to encourage you to orchestrate better. Of course, sometimes you need a mock-up, in which case the solution may be to produce that and then re-transcribe the piece manually into notation software.
It sounds very tedious — and it can be — but once you become one with your notation package it goes by pretty quickly. The one huge advantage is that it also allows you to really examine your piece and make sure that the transfer from sequence to score removes any of the sample-oriented oddities we discussed above. If you’re just importing and cleaning a MIDI, it’s easy to ignore those problems, whereas if you’re forced to re-enter and therefore re-examine them, you can correct them for your musicians while keeping the mock-up as is.
Again, your mockup should play to the strengths of your samples while your score should play to the strengths of your musicians.
Elements of a Good Score
Here we come to the details, the nitty-gritty. A score for a media recording session tends to look different from a formal concert score in several ways, and the primary reason that justifies all of the differences we will look at below is clarity. Your score must do everything it can to be immediately legible, comprehensible, and easy for the musicians and conductor to interpret.
Let’s break it down:
1. Title:
- You’re going to want your title to be as useful as possible. If you’re scoring a film and have 80 cues to get through, then you’re not going to want to think up cute album titles for each one. “Princess Pickle Fluffs Her Pillow” is not an intuitive title for a scoring stage — “1M5” is.
- If you’ve always wondered what that means, it comes from the days a film was split into “reels” that a composer would be given to score. So 1M5 would be the 5th cue in the first reel. 3M6 would be the 6th cue from the 3rd reel and so on. Makes it easy to keep track of where you are.
- If you want the title in there, a compromise is possible:
2. Time Signatures:
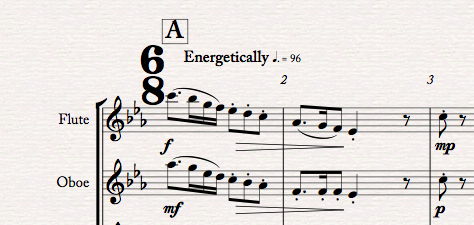
- Make them big. Use your notation program to ensure that you’re using oversized time signatures rather than the standard, “proper” little ones. Huge is good.
- The point of this is to make them easily visible for the conductor at a glance. She’s busy cueing and keeping everyone in time, so don’t make her squint.
- This is also helpful to make upcoming time signature changes very obvious so she can prepare for them.
3. Bar Numbers, Timecode, and Rehearsal Markings:
- Typically, bar numbers show up only at the beginnings of sections, or the first bar of every page — on a media score, you’ll want to have the bar number above each bar.
- This makes it so that you can go back and take it from any measure once more without forcing everyone to count bars and possibly make mistakes.
- The rehearsal markings serve essentially the same purpose but for broader sections of the cue. Many cues will be too short to have them, but if it’s a long one then using rehearsal markings to split each cue into smaller “sections” can make it easier to go back and re-do just one problem section if the rest was fine. This saves time on the stage.
- For film work, you will often find that adding the timecode above each bar can help the conductor sync up precise hitpoints. The timecode bar can also include markings for the hits as well as helpful descriptors: “Princess punches unicorn”.
4. Score Markings and Techniques:
- Remember clarity? This is where it’s most essential. Your tempo is not “Allegretto con moto e poco pistachio”, it is “Energetic and slightly nuts”. The fancy Italian or German or French terms are colourful, but they’re unhelpful on the stage. Also include a precise tempo number.
- Dynamics are very important: do not be ambiguous. Don’t leave an unspecified crescendo — from what dynamic to what dynamic should it go? Piano to mezzo-forte? To Forte? Be specific.
- Common techniques like pizzicato and staccato can appear in the score under their traditional names and symbols, but if you’re using some very modern and strange techniques or inventing your own then don’t expect that everyone will be familiar with obscure terminology. If there’s a specific effect you want, describe it in the score in plain English.
5. Notation:
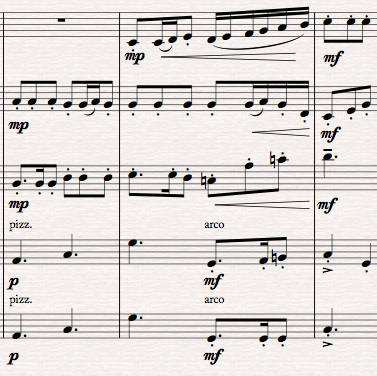
- Use cues. If your bass clarinets are quiet for a long while and then suddenly come in with an important theme, you want to make sure they’re entering with confidence, so give them a cue bar from whatever instruments are most prominent before them so they know when to come in.
- Be precise with how long you want notes to be held. Is it the full 4 beats or just three and a half? Do you want your percussion hits to ring out or be muted after a bar? Let the musicians know in the score.
- If one of your musicians needs to change instruments, retune his timpani, or perform any other similar modifications or changes, make sure to give plenty of warning in their parts so that they aren’t surprised and rushing at the last moment.
- Use cautionary accidentals liberally to ensure there are no accidental pitch slips, especially in highly chromatic work.
6. The Actual Sheets:
- Lay out your score and parts so that they’re not crowded. Leave plenty of breathing room between staves to ensure that musicians have room to write in their own notes and see everything clearly from the stand.
- Consult, if you can, with your conductor ahead of time to see if s/he prefers a transposing score or one in concert pitch. If in doubt, prepare both.
- Prepare some booth scores for the folks in the mixing room at a standard 8 ½ x 11 size.
- Prepare your conductor’s score in a nice big paper format like Tabloid (11×17). If there are multiple pages, tape the edges together accordion-style to minimize page turns and the sound of rustling paper which can and will be picked up by the sensitive microphones.
Considerations and Conclusions
The recording date will be a hectic and busy one, but if you’re well prepared it will also be a lot of fun. Make sure you have someone knowledgeable you trust look over your scores to make sure you haven’t missed any silly mistakes before you send them off to the printer, and even once everything is ready and you’re on the scoring stage, be prepared to make some last-minute edits if things aren’t working out. It happens and it’s okay as long as you’re prepared to handle it.
If you’re getting stressed, just remember that in most cases your musicians won’t be getting any rehearsal time. They’re sitting and sight-reading. Talk about pressure. Be understanding, be diplomatic with your commentary, and be appreciative of their time and effort. As a general rule, wait until after the second take before you start pouring out your comments as the first takes are generally rough while the musicians get used to their parts.
As a parting thought, I encourage you to thank your musicians after all is said and done and do your best to stay in touch with them. Forging strong relationships with performers ensures that they’ll come back to play for you in the future. And writing sophisticated, clearly notated music that they enjoy playing will make them want to.

