When you listen to violins or violas being played live, there are very many nuances going on in the high frequencies. These subtle noises are a result of the bow touching the strings. In most recordings these noises are lacking, which results in a muffled sound that is not very enjoyable to listen to. Therefore, there are many different ways to improve your sound.
Introduction
Keep in mind that there no rules and no limitations, just one doctrine: If it sounds great, it is great!
Note: It’s important to know how to write lines for strings in order to make them sound natural and sophisticated in the first place. No audio editing trick will turn a poorly written passage into something beautiful, so it may be a good idea to develop solid skills in both these areas – writing lines and audio editing.
Now here is a good and easy way to set up a spot on bow strokes, bow movements and nuances in order to freshen up the overall sound. The method described was originally used to brighten up vocal recordings, but it does a great job on strings as well.
Adding “air” and sizzle to high strings
Instead of editing the high strings audio track itself using insert effects, I am going to set up a separate send track or send bus. This way I am creating an option to edit the sound by adding new information to the original track without touching the original audio data at all. You will need to load three insert effects on the send bus in this particular order:
- Equalizer (EQ)
- Short ambience (Reverb)
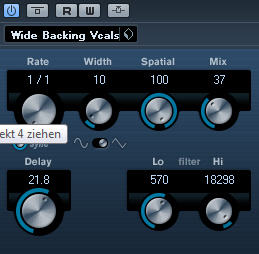
- Chorus
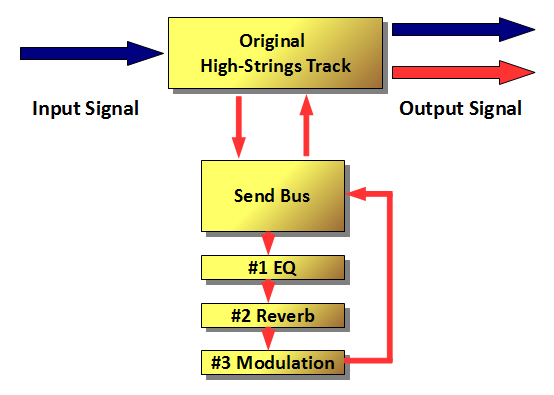
The following illustration shows the flow of the audio signal in your sequencer so that you will have an idea of what is going on. The blue line represents the original audio signal, and the red line represents the added send-return signal. As you can see, the output of the send bus returns and adds to the output of the original audio track.
Now let’s have a closer look at the settings of each of the effects. Obviously, every effect has its own relevance in order to create the sizzle that we are looking for. The first effect in the chain is the EQ.
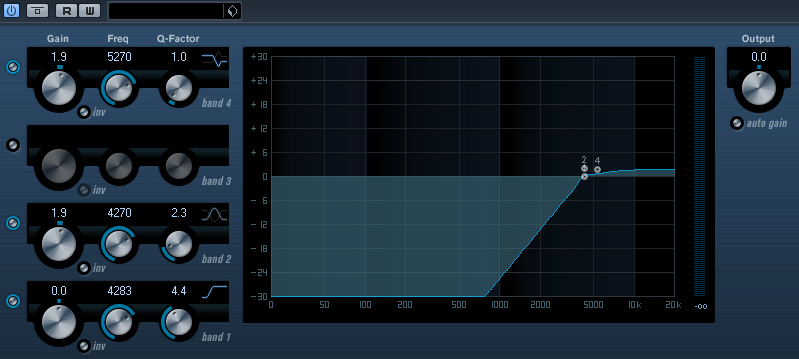
By using an EQ, we can determine the area of frequencies that we want to manipulate. As you can see, there is a high pass at around 4kHz. It is obvious that we want to get rid of all frequencies below 4kHz, so in the next steps only the high frequencies will be edited.
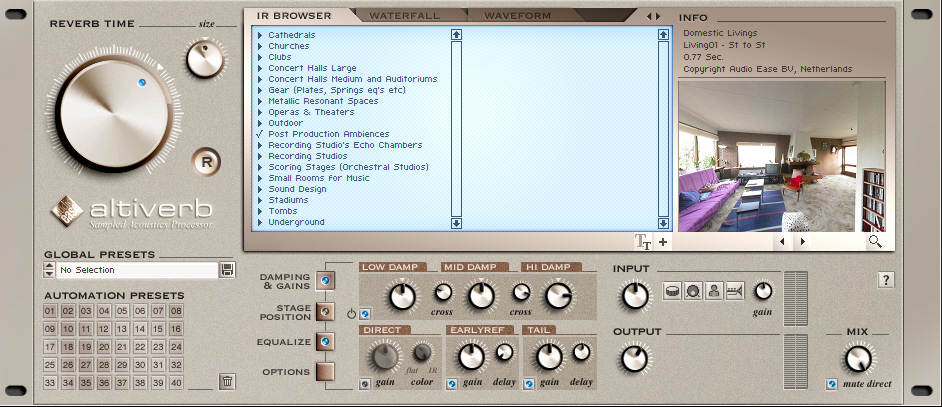
It’s important to use a short period of time for the tail because otherwise your overall sound will become very nontransparent later. In our case, the main purpose of the reverb is to create a slightly longer signal so the chorus gets “something” to work on. It is also possible to experiment with the settings for early reflections (ER) in order to push the sound a little more backwards, just be sure that your reverb output is set to 100% wet.
A chorus does permanent frequency modulation. So because we are going to return this signal back to our original audio track, the chorus prevents us from phasing. If you added up the same signal twice phasing would be the natural result because of the identical wave forms of the audio signal. Thus, by using a chorus, we generate a completely new wave form, and therefore, it is safe to add this bus signal to our original signal without causing any phasing problems.
An example for reference
After all three effects are set up on the bus, we are ready to turn this process into action. Listen to example1, which shows how a high string passage with the send bus turned off will sound. This means that you are listening to the original audio signal only. Example 2 is a rendering of both, the original audio signal as well as the send bus audio signal. It should be obvious to you that the sound is much brighter and more open. For demonstration purposes only, the effect is overdone, so make sure that you use it more subtly on your own productions. Example 3 is a little snippet of the final mix that is supported by drums and an upright bass.
Example 1
Example 2
Example 3
Note: In order to find the appropriate level of volume for the send bus, here is some (hopefully) helpful advice on that. Like it is so often mentioned, the most important thing is that you don’t overuse the effect. It should be barely audible in the mix, but it should be very clear when it’s switched off in an A to B comparison.
Of course, it’s a very important creative decision, whether or not this effect should be used at all in a particular project. However, it can certainly be very helpful to know about this method when someone asks you to give your strings more air and brightness.

